WP Ultimate CSV Importer Pro provides a user-friendly solution to import various types of JetReview data into WordPress, including Posts, Pages, custom post types, and WooCommerce. When you’re working with JetReview, a popular plugin for adding review functionality to WordPress posts and custom post types, you’ll want to import review data correctly along with your content. This guide will show you how to import JetReview data, including review author, review titles, review summary data, etc., using WP Ultimate CSV Importer Pro.
Steps to Import JetReview Data into WordPress Posts #
Follow the step-by-step instructions to seamlessly import your JetReview data on your WordPress Posts.
Step 1: Install and Activate WP Ultimate CSV Importer Pro #
To import your JetReview data into your desired posts, Install the WP Ultimate CSV Importer Pro plugin and activate it.
Step 2: Prepare Your CSV File #
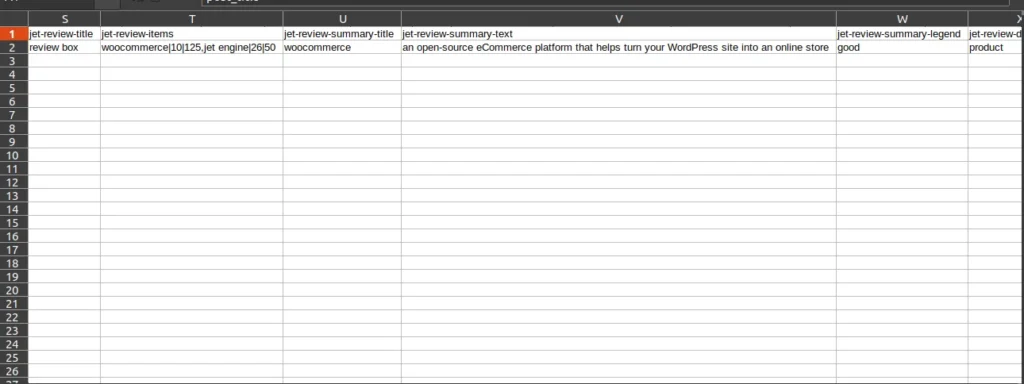
Before starting your import process, first, prepare your desired CSV file with the JetReview data to import.
The CSV file includes the desired columns for importing JetReview data. Below are the supported JetReview fields of the WP Ultimate CSV importer.
- Post Title
- Post Content
- JetReview Title
- Jet Review Items
- JetReview Summary Title
- JetReview Summary Text
- JetReview Data Name
- JetReview Data Image
- JetReview Data
- JetReview Data Author
Step 3: Import JetReview Data Using WP Ultimate CSV Importer #
Once you have prepared the CSV file, you can start the import process by following the below instructions:
- Navigate to WP Ultimate CSV importer in the WordPress dashboard and select the Import/Update option
- Upload the CSV file you have prepared in Step 2 by clicking on the Browse icon
- Then select the import type based on your import needs. Choose Fresh import for new data import and Update content for existing content.
- Now, to import posts, select ‘Posts’ from the drop-down.
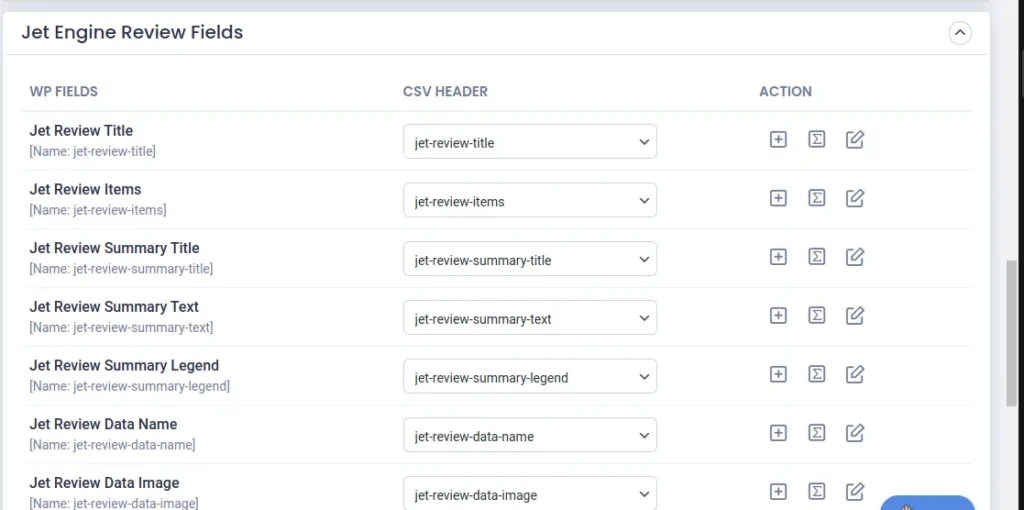
- Map the CSV fields with their corresponding WP fields. The fields are auto-mapped by default. You can also add custom field mapping with advanced mode or drag-and-drop mode.
Example: Map the “Post Title” column in your CSV to the post title field and the “Post Content” column to the content editor. Also, map the other desired Posts related fields.
Map JetReview Fields: Map the columns of your desired JetReview fields such as JetReview title, JetReview summary text, etc, to the corresponding fields in your WordPress site.
6. Once done with the Mapping, provide a unique name for the mapping template and click on Continue.

WP Ultimate CSV Importer Pro
Get Ultimate CSV/XML Importer to import data on WordPress faster, quicker and safer.
Step 4: Manage Media Handling #
In the Media Handling section, you can efficiently manage the import of your featured image. You can enable the desired media option based on your import needs.
- Upload the media images if already available
- Overwrite the available images
- Always create a new image
Step 5: Configure Import Settings and Run Import #
Now configure the below import settings for an efficient and seamless data import.
- Enable Safe Prestate Rollback option- Backup Before Import
- Do you want to Switch ON Maintenance mode while importing?
- Do you want to handle duplicates in existing records?
- Do you want to schedule the Import?
Step 6: Review and Adjust Imported Data #
After the import is complete, check the posts on your WordPress site to verify that the JetReview data has been correctly imported, including the review title, authors, and any other JetReview data.
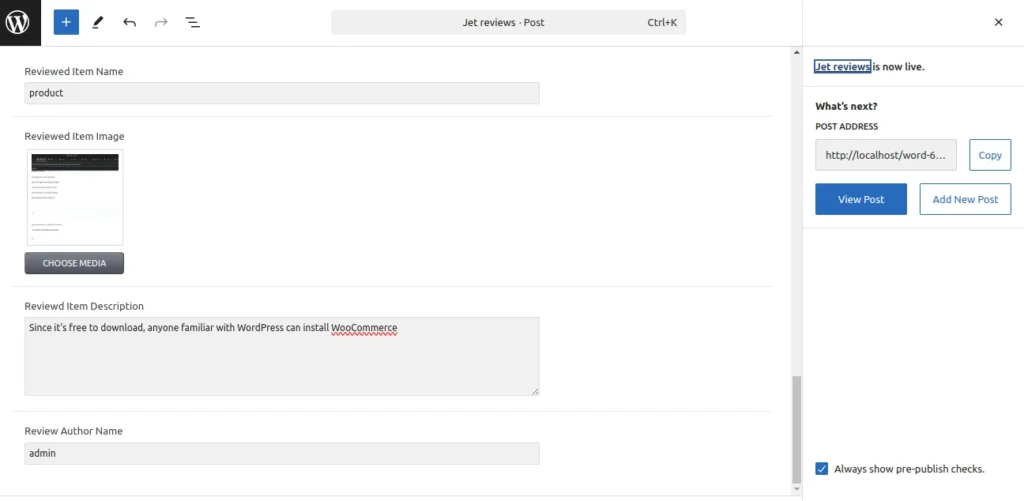
If the JetReview data has not been properly mapped, you can edit the post and update the review fields manually or run a re-import with the corrected mapping.
Tips for Successful JetReview Import #
- Backup Your Site: Before performing any import, always backup your WordPress site to prevent data loss in case of errors.
- Check Field Mapping: Carefully map each JetReview-related field to the correct CSV field during the import process.
- Test with a Small Sample: Start by importing a small sample of data to verify that the mapping works correctly before proceeding with the full import.
- Validate Data: After importing, check the product or post pages to ensure that review data, such as author names and review titles, is displayed correctly on the front end.
Troubleshooting #
- Missing Reviews: If your reviews are not showing up on the posts, check the field mapping again to ensure that the JetReview fields are mapped correctly.
- Review Display Issues: If JetReview data appears on the backend but not on the front end, ensure that JetReview is properly configured to display reviews on your posts. This may involve enabling JetReview widgets or templates.
Advanced Topic: Importing JetReview on WordPress Pages #
The import process is the same for posts, pages, custom post types, and WooCommerce. So follow all the above steps and in Step 3, choose the data type as Pages and continue the other Import Steps for seamless import of JetReview data on your desired WordPress Pages
Exporting WordPress CustomPosts with its JetReview Data #
To export the WordPress custom Posts with its JetRevew data,
- Navigate to the WP Ultimate CSV importer Pro and select the Export option
- Now Choose your desired Custom Post types from the data types list and click on Continue
You can choose the new mapping for your export file by clicking on Create New mapping or you can use the saved mapping template by clicking on the Use Template button. - Provide the desired File name and File type
- You can also use the advanced filter option to export your posts most specifically. For example, export the custom posts with desired ACF fields.
- You can also schedule the export process by clicking on the schedule option
- Once done click on the Export option. Now your custom posts with its JetReview data will be exported in your desired File type.
Using WP Ultimate CSV Importer Pro, importing, and exporting JetReview data into WordPress is a straightforward process when you follow the correct mapping of CSV fields to the custom post types used by JetReview. Proper field mapping ensures that all your review data, including review title, review author, etc., are imported accurately and displayed correctly on your WordPress site.
Importing & Exporting JetReviews Post Type Data with WP Ultimate CSV Importer #
In addition to importing JetReviews data into WordPress Posts and Products, WP Ultimate CSV Importer Pro now offers enhanced functionality to import and export JetReviews custom post type. This means you can manage and transfer JetReviews post types and their associated data (like review content, ratings, authors, etc.) with ease, just like any other custom post type in WordPress.
Below is a step-by-step guide for importing and exporting JetReviews post type data using WP Ultimate CSV Importer Pro.
Steps to Import JetReviews Post Type Data into WordPress #
Follow these steps to import JetReviews data for JetReviews custom post types into your WordPress site.
Step 1: Install and Activate WP Ultimate CSV Importer Pro #
- Ensure that you have installed and activated the WP Ultimate CSV Importer Pro plugin.
Step 2: Prepare Your CSV File #
- Prepare your CSV file with the JetReviews post-type data. The CSV should include the columns for the relevant JetReviews fields, including review titles, summary, author data, and ratings.
Supported Fields for JetReviews Post Type Import:
- Review Post ID
- Review Source
- Review Post Type
- Review Author
- Review Date
- Review Title
- Review Content
- Review Type Slug
- Review Rating Data
- Review Rating
- Review Likes
- Review Dislikes
- Review Approved
- Review Pinned
Step 3: Import JetReviews Post Type Data Using WP Ultimate CSV Importer #
- Go to the WP Ultimate CSV Importer section in the WordPress dashboard and select Import/Update.
- Upload the prepared CSV file by clicking on Browse and selecting the file.
- Choose JetReviews as the import type in the data type dropdown. This ensures you are importing data specifically for the JetReviews custom post type.
Step 4: Mapping JetReviews Fields #
- Carefully map each CSV column to the appropriate JetReviews post type field. You can map fields like Review Title, Review Content, and others to the respective fields in your WordPress setup.
- Once the mapping is complete, save the mapping template with a name at the bottom of the page and click on Continue to proceed.
Step 5: Media Handling #
- You can manage media uploads, like images, in this step. If your JetReviews include images, choose the appropriate media import options to handle them (overwrite existing images, create new images, etc.).
Step 6: Configure Import Settings and Start Import #
- Configure other import settings such as:
- Safe Prestate Rollback: Enable this option to create backups before starting the import.
- Maintenance Mode: Choose whether to enable maintenance mode during import.
- Duplicate Handling: Specify how duplicates should be handled.
- Schedule Import: Optionally schedule the import process to run at a later time.
Finally, click on Import to start the process.
Step 7: Verify Imported Data #
- Once the import is complete, go to the JetReviews post type section in your WordPress dashboard. Check if the imported reviews and associated data are displaying correctly.
Steps to Export JetReviews Post Type Data from WordPress #
To export JetReviews custom post type data, follow the steps below:
Step 1: Go to Export Section #
- Navigate to the WP Ultimate CSV Importer Pro and select the Export option.
Step 2: Select JetReview as Modules #
- Choose Jet Reviews from the list of available post types and click Continue.
Step 3: Configure Export Options #
- You can create a new mapping template or use an existing template(only shows if you have already exported data from this post type).
- Specify the file name and file format for your export (CSV, XML, XLS, or JSON).
- If necessary, apply advanced filters to export specific JetReviews posts based on criteria like date ranges, etc.
Step 4: Schedule Export (Optional) #
- You can schedule the export to run automatically at a desired time. This can be useful if you need to export your site data regularly.
Step 5: Export the Data #
- Click Export to generate the file in the chosen type with your JetReviews post-type data. Finally, click Download and save the file to your device.
WP Ultimate CSV Importer Pro
Get Ultimate CSV/XML Importer to import data on WordPress faster, quicker and safer.