Table of Contents
Introduction
Multilingual websites are becoming increasingly common as businesses and individuals aim to reach a global audience. Polylang is a popular WordPress plugin that facilitates the creation of multilingual websites. In this tutorial, we’ll explore the process of Polylang migrating translations for various content types, including posts, pages, custom posts, and custom fields.
What is Polylang?
Before diving into the import process, it’s essential to have a basic understanding of how Polylang works. Polylang allows you to create and manage multilingual content by associating different language versions of a post, page, or custom post type. It also supports translations for custom fields.
For efficient content translations install and activate the Polylang plugin in your WordPress website.
How do you set up languages on a WordPress site using Polylang?
Once you install the Polylang plugin, it is time to set up the language to translate your WordPress site content into your preferred languages.
To set up languages in Polylang,
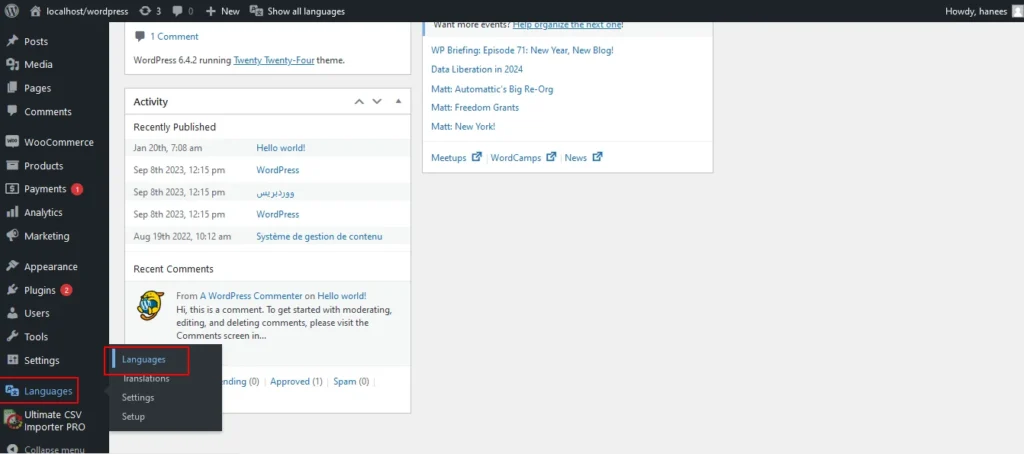
- Login to your WordPress website and navigate to the Language tab from the left-side menu
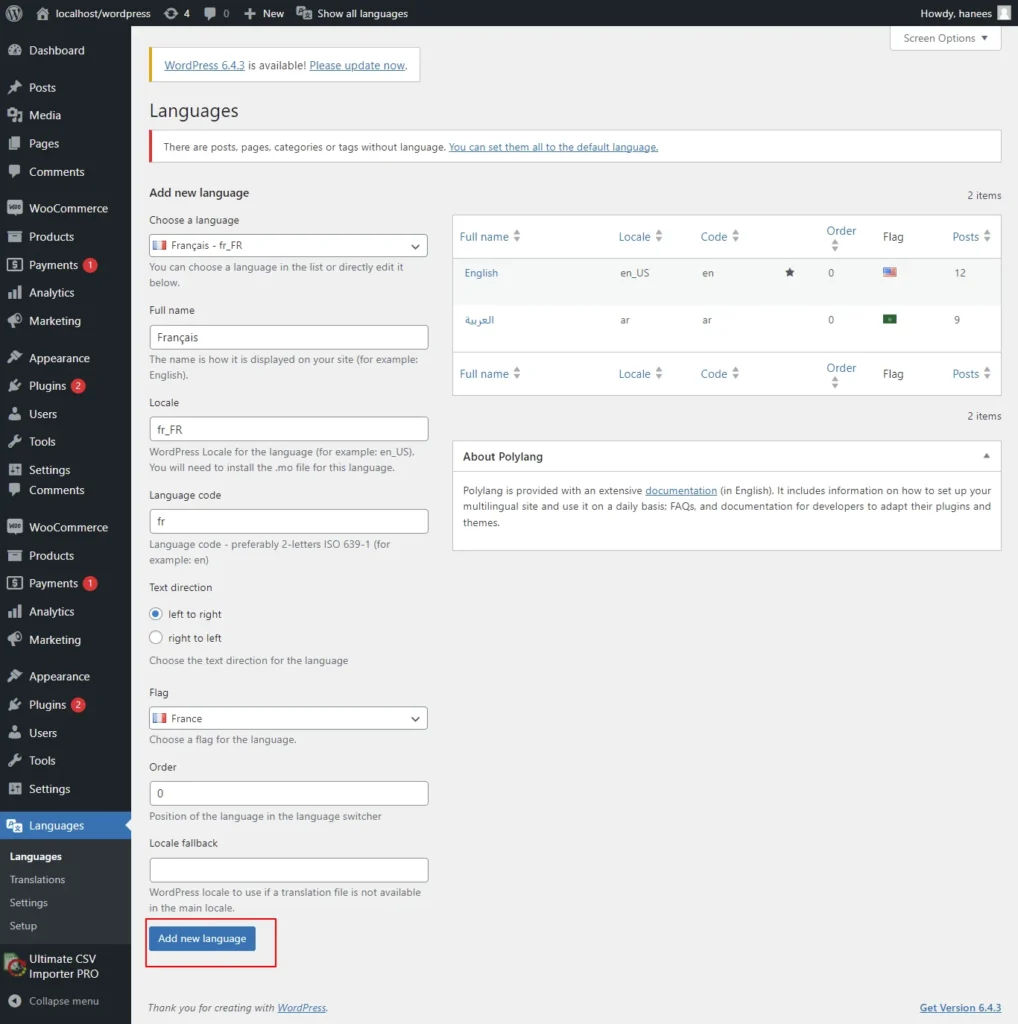
- Choose the language from the drop-down menu. Once you select the language, all the other fields like the Full name, locale, and language code have been updated automatically.
- Then click on Add Language.
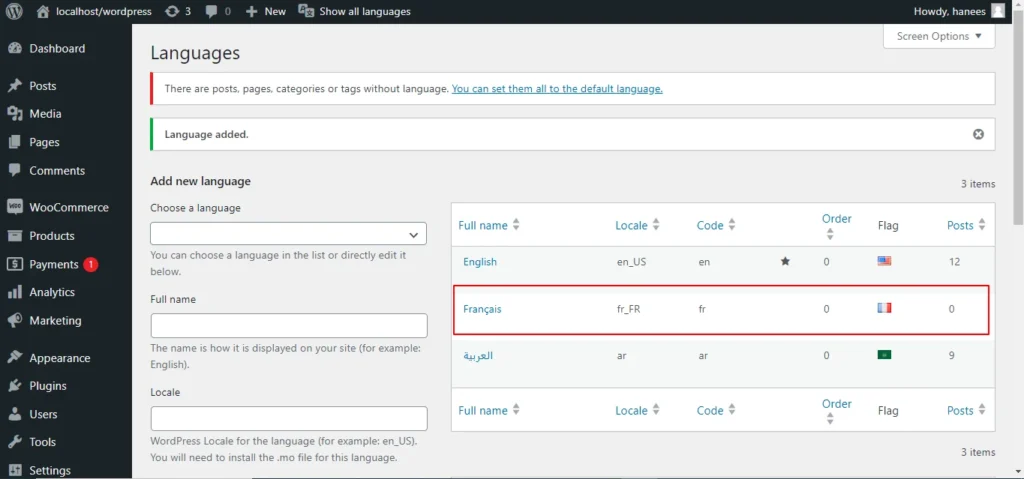
- Now your language has been updated in the right side table.
How to Import Polylang translated content in your Multilingual Websites?
Before Importing the Translated content of Polylang, let us understand the basic reasons and benefits of importing translated content in WordPress.
Key reasons to import translated content in WordPress
Importing translated content into WordPress can be essential for several reasons, particularly when managing a multilingual website. Here are some key reasons why importing translated content is crucial:
- Global Reach and Audience Engagement: Importing translated content allows you to reach a wider global audience. By offering your website in multiple languages, you increase accessibility and engage users who prefer to consume content in their native language.
- Enhanced User Experience: Providing content in the user’s preferred language enhances the overall user experience. Visitors are more likely to stay on your site and explore its offerings when they can easily understand and navigate the content.
- SEO Benefits: Translating content helps improve your website’s search engine optimization (SEO). Search engines recognize and index content in different languages, making it more likely for your site to appear in search results for users searching in those languages.
- Catering to Diverse Markets: If your business operates in or targets diverse markets, importing translated content is crucial for effectively communicating with customers from different linguistic backgrounds. It demonstrates cultural sensitivity and a commitment to serving a global clientele.
- Compliance with Local Regulations: In some regions, there may be legal requirements or industry standards that mandate providing information in specific languages. Importing translated content ensures compliance with such regulations and helps you avoid legal issues.
- Multilingual Content Management: WordPress plugins like Polylang make it easier to manage multilingual content. Importing translations allows you to efficiently handle posts, pages, custom posts, and custom fields in multiple languages within a unified content management system.
- Consistency Across Languages: Importing translations helps maintain consistency in messaging and branding across different language versions of your website. It ensures that the translated content aligns with the original message and intent.
- Efficient Content Localization: Instead of manually translating and inputting content for each language, importing translations streamlines the localization process. It saves time and resources, allowing you to focus on creating high-quality content rather than duplicating efforts for each language.
- Adaptation to Regional Preferences: Different regions may have specific language nuances or preferences. Importing translated content enables you to tailor your messaging to resonate better with audiences in various geographic locations.
- Facilitates Regular Updates: As your website evolves, regularly importing translated content ensures that the latest updates and changes are reflected across all language versions. This is crucial for keeping the information current and relevant for all users.
CSV Importer for Polylang- WP Ultimate CSV Importer Plugin
The WP Ultimate CSV importer is an all-in-one import tool that helps to import, update, and export your WordPress content in their desired file format.
With WP CSV importer, it is easy to import the Polylang translations with few clicks. The translated content will be imported into your WordPress Website in the languages that we have set up in the Languages section.
In this blog, we will have step-by-step instructions on how to import pages, posts, custom posts, and custom fields in Multiple languages.
How to prepare a CSV to import the content of Polylang translations?
Every content import includes the CSV files with the translated content. Whether it is posts, pages, custom post types (CPTs), etc it is important to prepare a csv file with the original content and the translated content
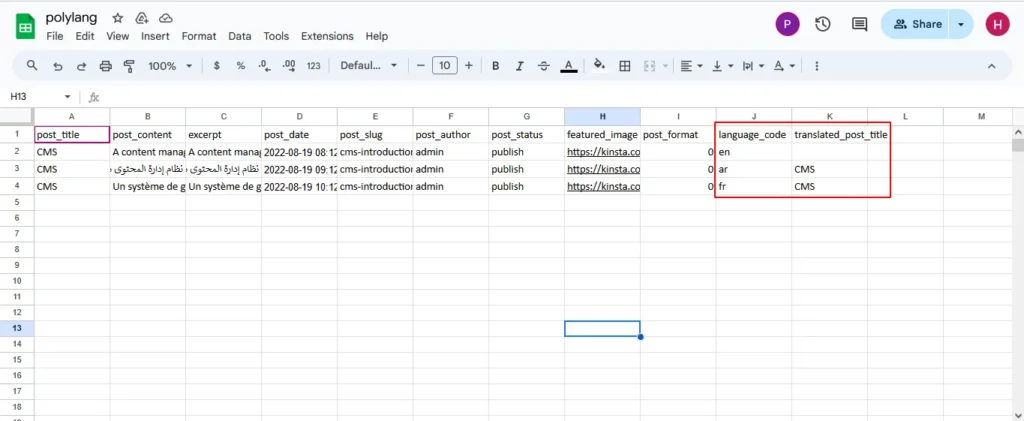
- To import the content into the Multilingual website, add two additional columns in the csv file called language_code, and translated_post_title.
- Provide the language code with respect to its related content.
- Leave the translated_post_title field of the original content as empty.
- Enter the post title of the original content in the translated_post_title fields of the translated content
- Save and download the CSV file

WP Ultimate CSV Importer Pro
Get Ultimate CSV/XML Importer to import data on WordPress faster, quicker and safer.
How to Import Posts, and Pages in Polylang Translation?
The WP CSV importer plugin will make the job easy to import the posts, and pages in the polylang translations.
To import translated posts, and pages in Multilingual Website,
- Navigate to the WP CSV importer Plugin from the left side menu.
- Click on Import/Update from the top sidebar
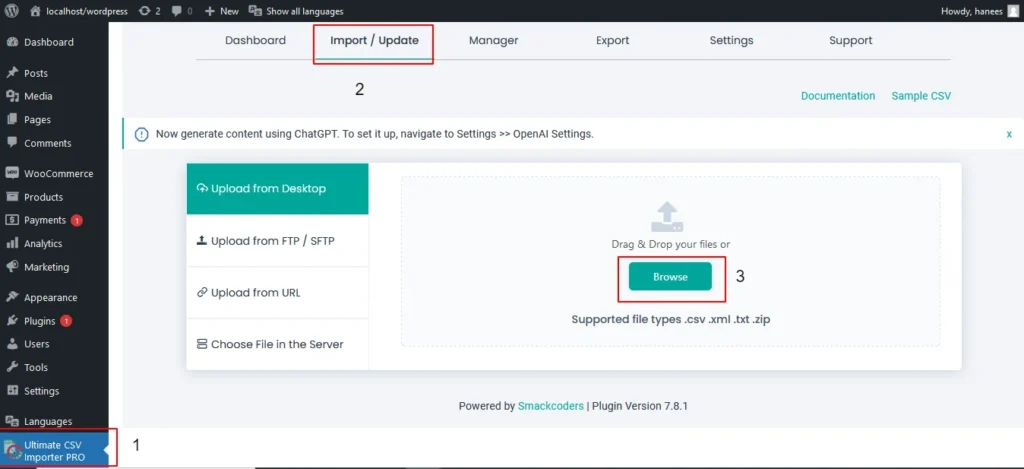
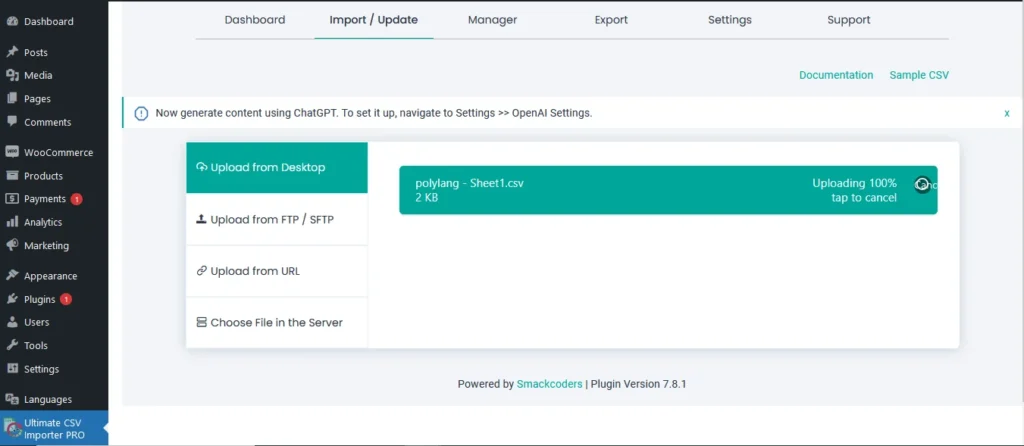
- Browse the prepared CSV (posts, or pages) from your downloads.
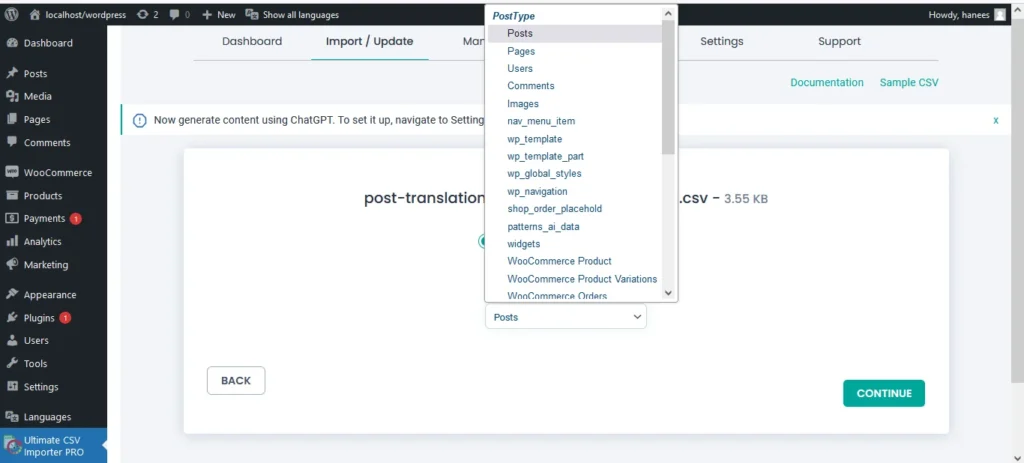
- Select the content type that you want to import in the “Import each record as” field
- Then click on continue for mapping.
- Now click on Create New Mapping. Or If you want to use the existing mapping template, you can click on the saved templates.
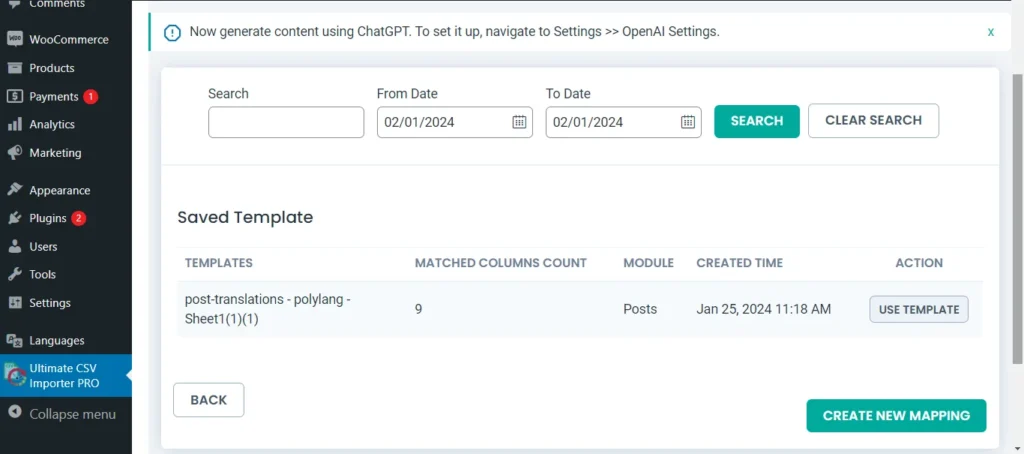
- In the mapping section, you can map the CSV header field with its related WP fields by means of the drag-and-drop method or advanced method( Mapping the fields by means of selecting the desired field from the drop-down)
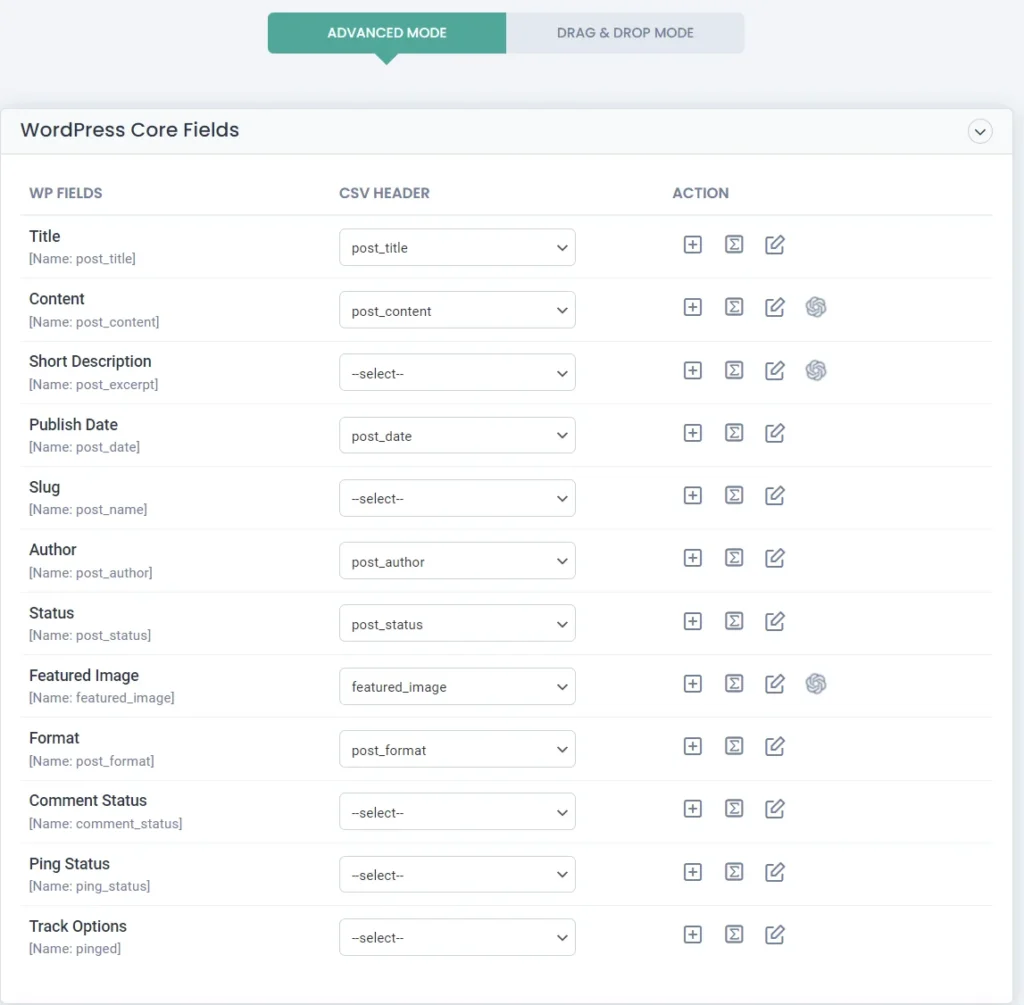
- Verify the mapping of the polylang settings field. That is language_code and translated_post_title.

- You can also add mapping for the custom fields. Once done with the mapping save the mapping template with the unique name.
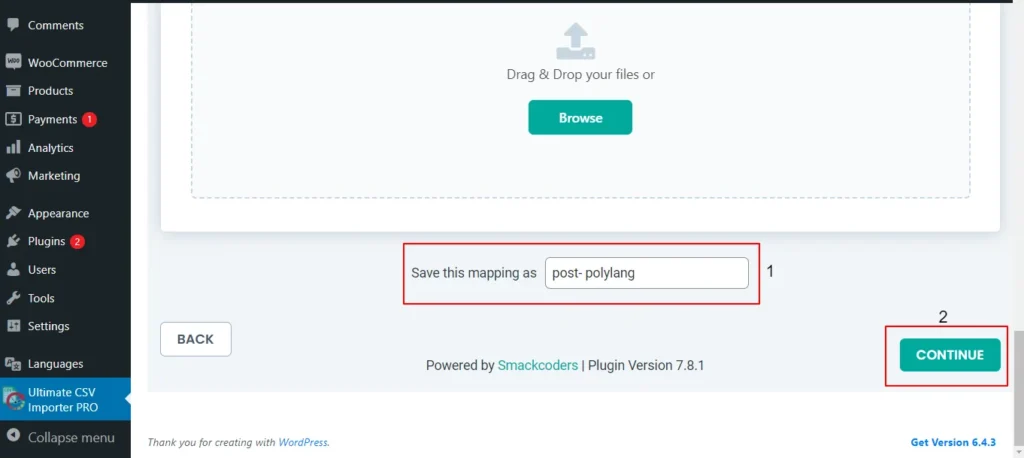
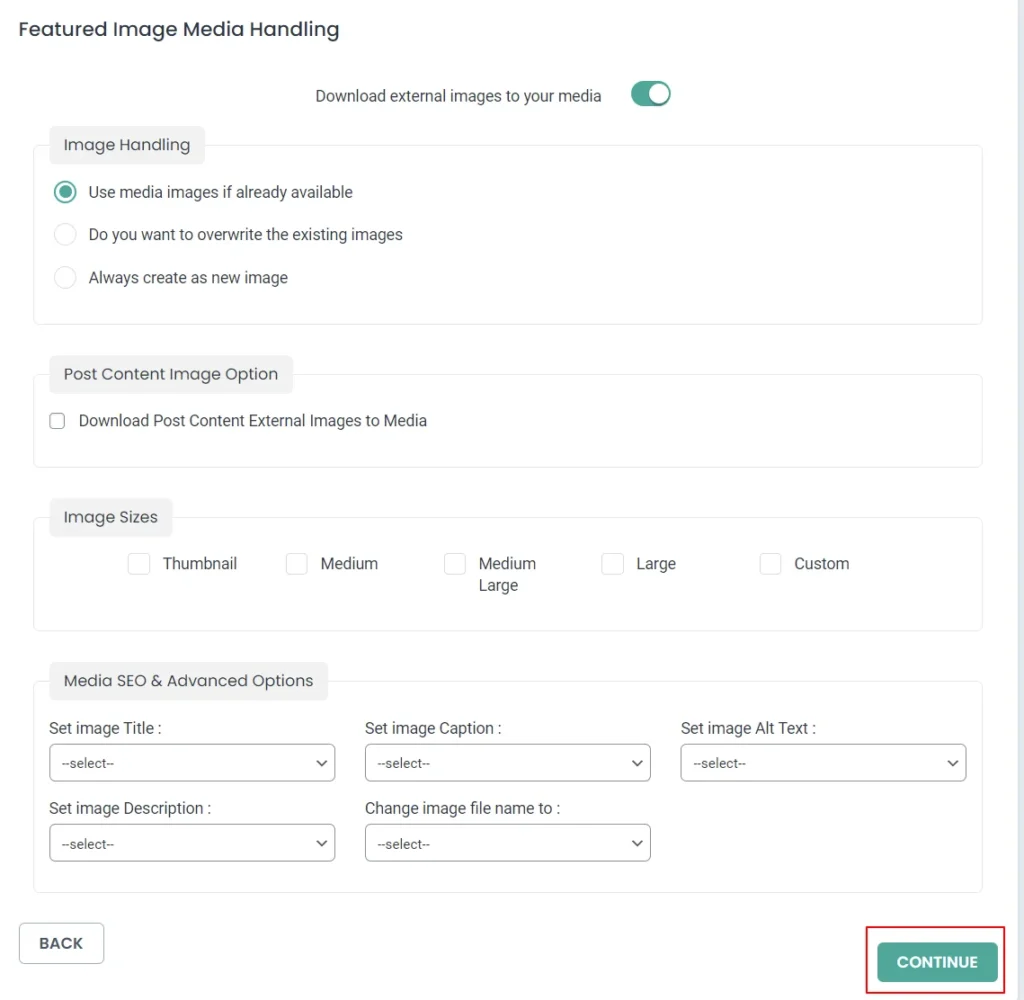
- Click on Continue for featured media handling.
- Here you can enable the desired field for handling media files.
- Here you can have all the options to import your featured image based on your business needs.
- You can enable the download of external images to media while importing the posts
- Also, you can select your desired image handling and image size.
- You can map the media SEO and Advanced Options
- Click on Continue
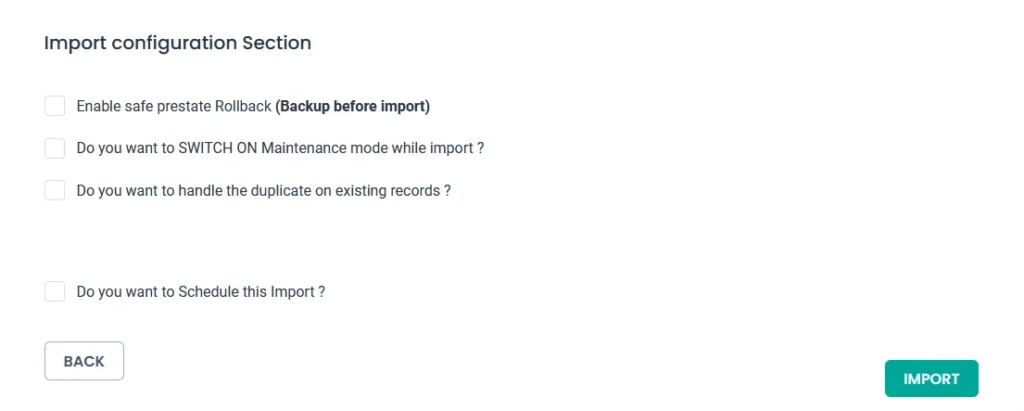
- Then configure the Import configuration settings and Click on Import.
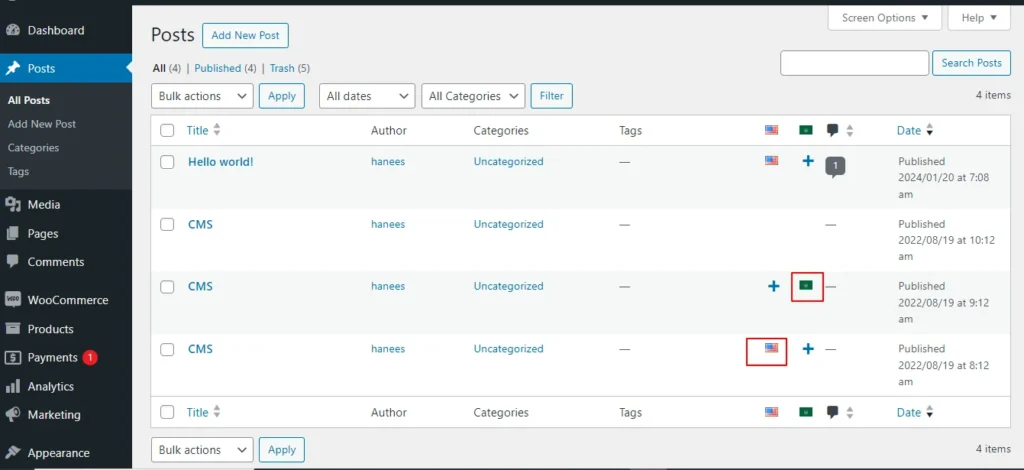
- Now your post/page has been successfully imported in the desired languages that have been set on polylang.
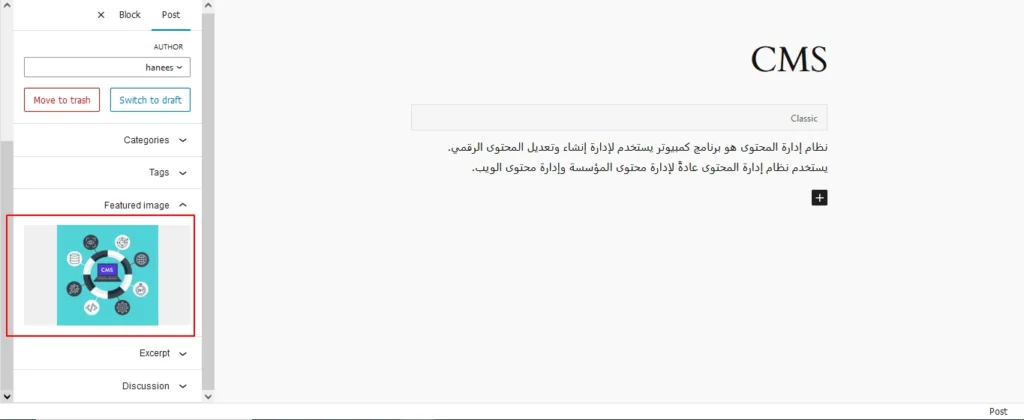
- You can click on the view log to view the successful post/page import on Multiple languages

This is how your translated post content mentioned on your csv has been imported into Multilingual Websites.
How to import Custom Post types and custom fields in Multilingual Websites?
Before diving into the topic of how to import custom post types and custom fields in polylang translation, let us have a basic understanding of What custom post types (CPT) and Custom fields are.
What are Custom Post Types and Custom fields?
WordPress comes with two primary content types: posts and pages. However, in many cases, websites require additional content types that may have distinct characteristics and purposes. This is where custom post types come into play. Whereas custom fields provide a way to store and display specific information related to the content.
For example, if you are building a real estate website, you might create a custom post type for “Properties” with specific custom fields such as price, location, and number of bedrooms. This ensures that the content is structured in a way that suits the website’s needs.
Things to remember before importing custom posts and custom fields
- Ensure that you have created your custom post types and have assigned the custom fields to the desired post types.
- Ensure you have prepared a csv for the custom post types and all the fields included in that custom post type have been properly assigned to the respective post type.
- Ensure you have included the language_code and translated_post_title in the prepared CSV.
Steps to import Custom post types in Polylang translations
Importing translated custom post types is now efficient and effective with WP CSV Importer Pro. You can easily import the translated custom post types of any third-party plugins such as ACF, Jet engine, Metabox, etc.
However, the WP CSV importer Pro will provide support to all the ACF custom fields except that of the layouts sections.
The supported ACF fields for Translated custom field Import are listed below:
Basic: Text, Text area, Number, Range, Email, URL, Password
Content: Image, File, WYSIWYG Editor, oEmbed, Gallery.
Choice: Select, CheckBoxes, Radio Button, Button Group, True/False.
Relational: Link, Post object, Page Link, Relationships, Taxonomy, User.
Advanced: Google Maps, Date Picker, Date Time Picker, Time Picker, Color Picker
The Import steps are the same for all the content types in the WP CSV importer Pro plugin.
Prepare the CSV File:
The exported translations will typically be in a CSV (Comma-Separated Values) format. Open the CSV file using a spreadsheet editor like Microsoft Excel or Google Sheets. Ensure that the file structure is correct, with columns for the original content, translations, and language codes.

Importing Translations:
Now that you have a CSV file containing your Polylang translations, it’s time to import them back into your WordPress site. Follow these steps:
- Navigate to “WP Ultimate CSV Importer Pro” in the WordPress dashboard and select “Import/Update”
- Upload the CSV file you prepared earlier and follow the on-screen instructions.
- Choose the content type you want to import translations for. On the ”Import Each record as” field all the custom post types of ACF, Jet engine, Metabox or any plugin and the ACF custom fields are displayed on the drop-down.
- All your custom post types and the ACF custom fields have been listed in the drop-down
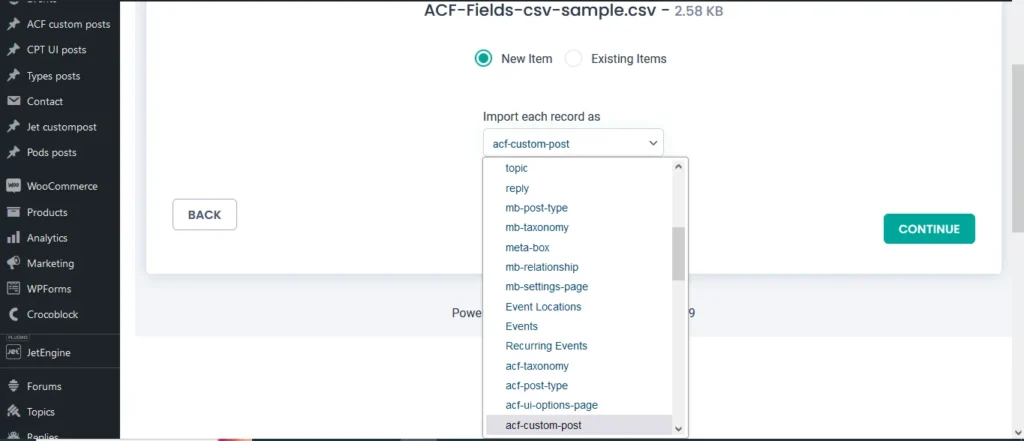
- Select the desired Custom Post types or custom field that you would like to import
- Click on Continue. Map the WP fields with respect to their corresponding CSV headers.
- Importing translations for custom fields might require additional steps. If your CSV file includes custom field translations, you may need to ensure that the custom field names match those in your WordPress setup.
- Map the Custom field Suite and all the desired fields.
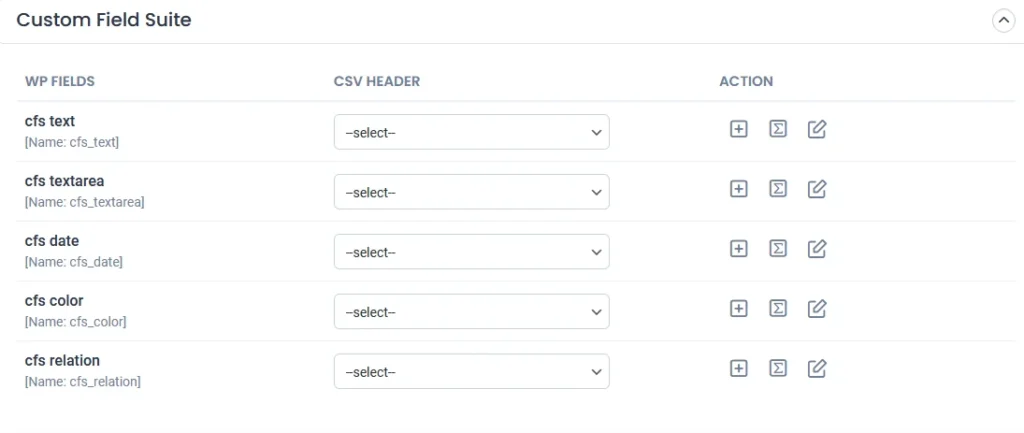
- You can also add Mapping for the custom fields by simply clicking on the Add Custom Fields.
- Ensure that the Polylang settings field is mapped correctly.
- Save the mapping template with the unique name and click on continue
- Enable the desired field in the Feature Image Media Handling section, and click on Continue.
- Configure the Import Section and click on Import.
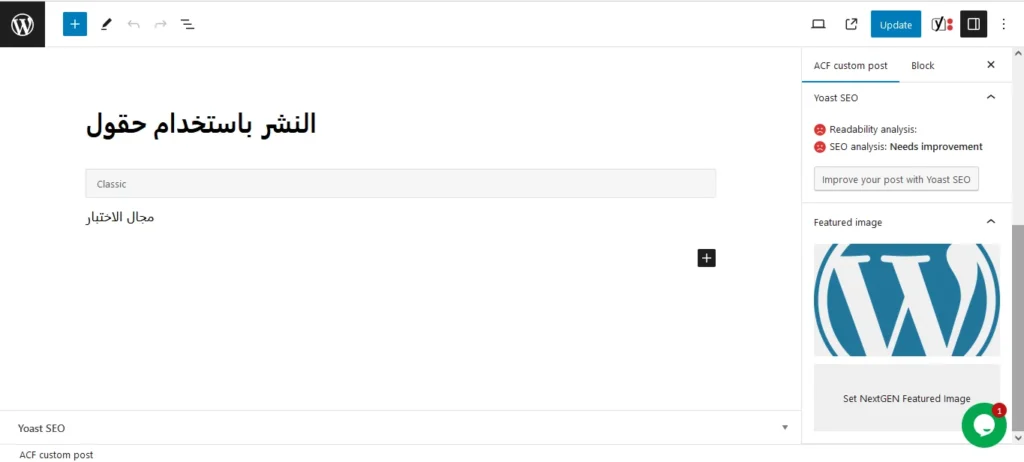
- Now your CPT/ custom fields have been successfully imported into the Multilingual Website.

You can also view the log by clicking on View log-> admin view to verify the imported posts.
How to import taxonomies in Polylang translations?
Importing polylang translations with WP Ultimate CSV importer includes the same steps for all the content types. You can refer to the Importing steps explained above to import your taxonomies into Multilingual Websites.
WP CSV importer has smartly designed to import your translated post/page along with its taxonomies. That is if you import a post, then its related taxonomies like post_categories and post_tag (need to be included in the csv) have been imported with the post itself.
However, you can also provided with an option to import taxonomies alone without a post.
Steps to Import translated Post categories and Post tags
- Prepare a csv with the translated content of (post_categories/ post_tags)
- Add language_code and translated_post_title.
- Navigate to CSV importer -> Import/update-> Browse the CSV
- Select the content type as categories or tags
- Map all the desired fields like post_categories/ post_tags.

- Ensure the polylang settings field is mapped correctly
- Save the Mapping template
- Configure the Import process and click on Import.
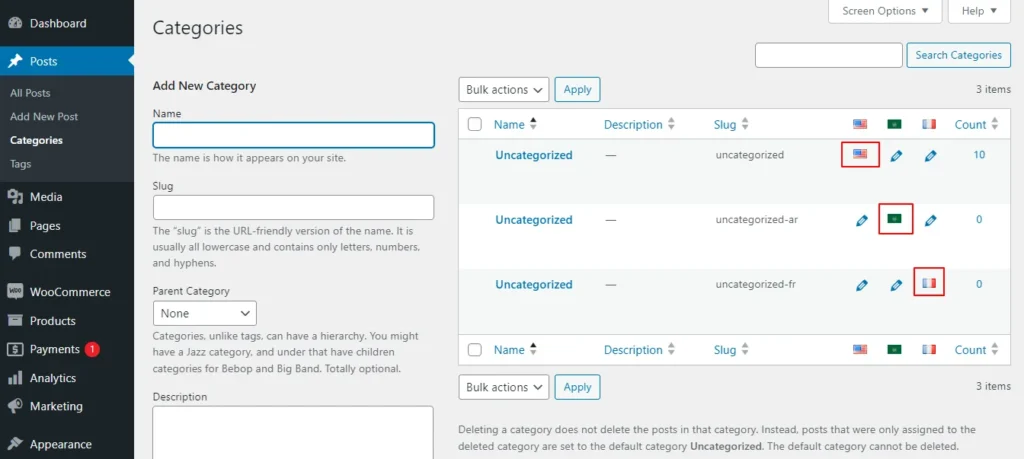
- Now the categories has been imported into the Multiple languages
Post Importing Steps
Once you successfully imported your polylang translations, there are few things to consider. That are listed below:
Verification and Troubleshooting
After the import process is complete, it’s crucial to verify that the translations have been applied correctly.
Regular Maintenance
Keep in mind that website content evolves over time. Periodically export and import translations as you update your content. This ensures that your multilingual website remains up-to-date and provides a seamless experience for users across different language preferences.
How to export translated content in WP Ultimate CSV Importer?
Like importing, the export process of Polylang translation is quiet easy with WP ultimate CSV importer plugin. Moreover, this plugin is an all-in-one tool that smartly import and export your translated content from/to the multilingual websites.
The export process is same for all the content types. Let see an example of how to export pages in Multiple languages.
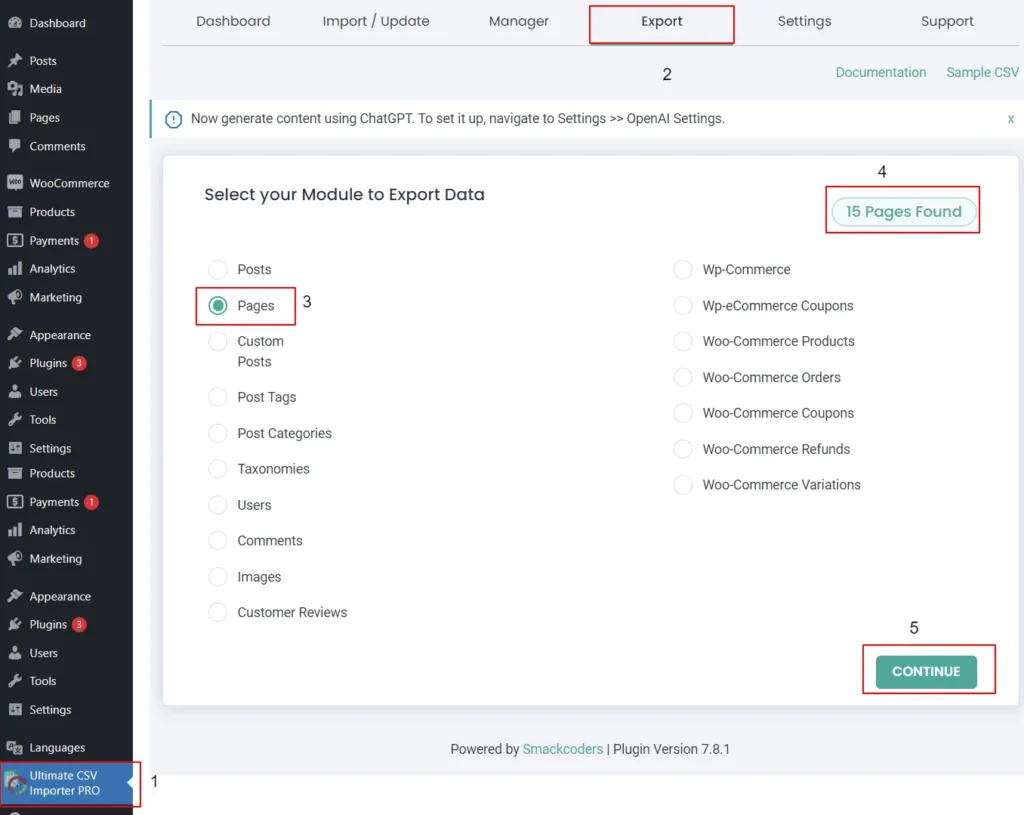
- For that, navigate to WP ultimate CSV importer
- Select Export from the top side menu and choose the content type that you want to export
- Here I select pages. It displays the number of pages including the polylang translation has been displayed.Now click on continue
- Provide the File name and File type. Here I select CSV.
- You can also Export your translated content with advanced filters.
- Now click on Export.
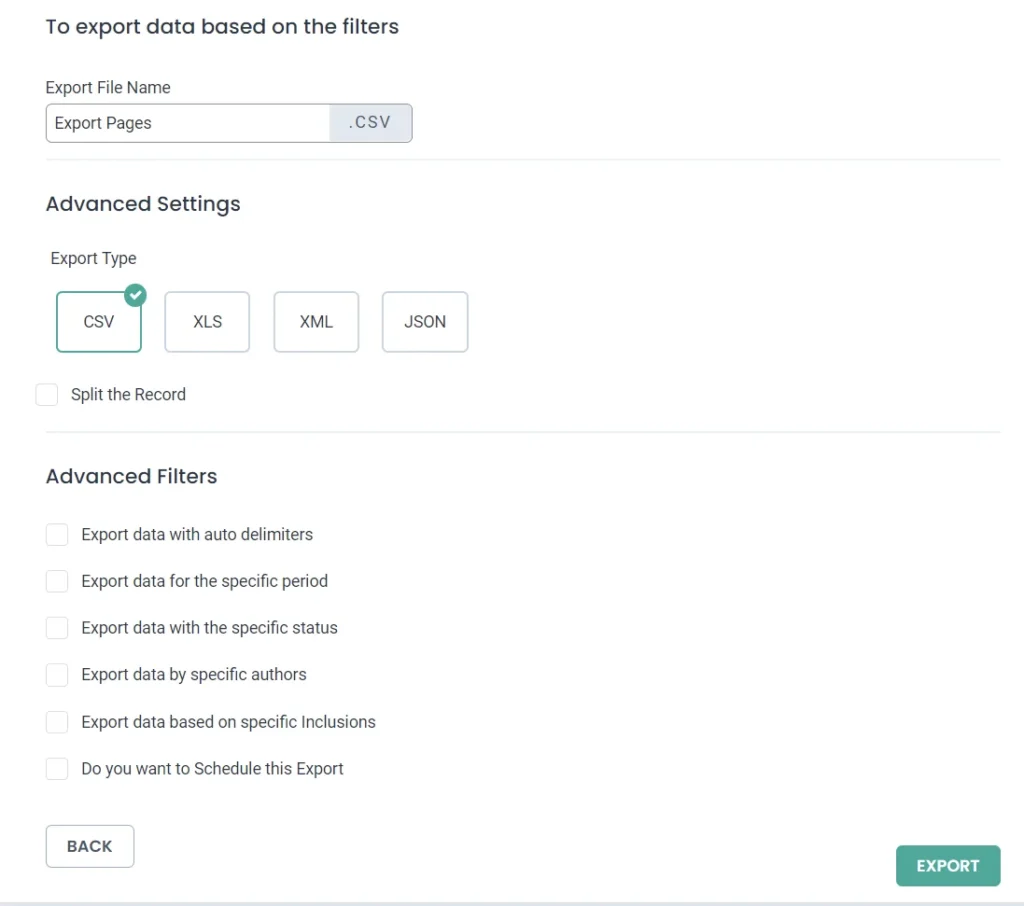
- Your WordPress pages with polylang translations has been exported. Now click on download to download the exported file in your local computer.

- The exported pages with polylang translation will now be downloaded as desired file type.

Conclusion
Importing and Exporting Polylang translations for posts, pages, custom posts, and custom fields is a crucial step in maintaining a dynamic and effective multilingual website. By following the steps outlined in this guide, you can streamline the translation import & export process and provide a seamless experience for your global audience.
Refer to our user guide for step-by-step instruction to migrate Polylang Translations for WooCommerce Products, Variations and Orders


