Table of Contents
Are you interested in scaling up your e-commerce store by migrating from Shopify to WooCommerce? You’ve come to the right place!
This article provides step-by-step instructions on how to migrate Shopify to WooCommerce quickly and easily. In this post, we will explain how to transfer products, customers, and orders from Shopify to WooCommerce in detail.
Why is WooCommerce a better choice than Shopify?
Shopify and WooCommerce are both great e-commerce platforms and have their pros and cons.
Shopify may have been your best option in the initial stages of creating your e-commerce store, due to its ease of use and security. But over time, you might have realized that the platform incurs increasing costs at every step. Moreover, Shopify limits your control over your website and offers only minimum flexibility.
If you are looking for more customization and control over your website, WooCommerce is the perfect choice. Besides being a cost-effective alternative to Shopify, WooCommerce also excels in SEO and search engine rankings.
So as the final verdict, WooCommerce is better than Shopify in the longer run due to the following reasons:
- It is a free open-source platform
- It’s significantly less expensive than Shopify (Additional plugins may be available for free, as a one-time purchase or through annual subscriptions, often more cost effective than Shopify)
- No transaction fees
- Allows high customization
- Flexibility with payment gateways.
Step-by-Step Guide to Migrate Shopify to WooCommerce
Both Shopify and WooCommerce have built-in export and import options, but they are limited. For example, the import option in WooCommerce only allows you to import products, not orders or customers.
To overcome these limitations and achieve a smooth and error-free move from Shopify to WooCommerce, we need third-party plugins. WP Ultimate CSV Importer is a powerful tool that facilitates a seamless and quick Shopify to WooCommerce migration.
Unlike other Shopify to WooCommerce migration plugins, WP Ultimate CSV Importer also allows you to migrate coupons and reviews into your WooCommerce store, which we will discuss later in this guide.
To transfer your store from Shopify to WooCommerce, you need to migrate data in the following order:
Products → Customers → Orders
First, let’s go over the prerequisites.
Step 1: Set up your WordPress site and install the WooCommerce plugin
Since WooCommerce is integrated into WordPress, you need to set up your WordPress site first.
- Choose a suitable hosting plan to host your WordPress site on the web server and purchase your domain name.
- If your hosting service offers you a one-click installation for WordPress, you can proceed with it, or else you can download WordPress from wordpress.org
- Configure basic settings and then log in to your admin account.
- In the WordPress dashboard, go to Plugins → Add new, and install WooCommerce by searching it.
Step 2: Install WP Ultimate CSV Importer
There are many plugins available to import Shopify to WooCommerce. But if you need an all-in-one solution to migrate products, customers, orders, reviews, and coupons, then you should try out WP Ultimate CSV Importer.
- You can purchase the premium plugin from our website.
- Install the plugin and activate it in your WordPress dashboard.
Now that we have completed the prerequisites, let’s proceed to exporting data from your Shopify store.
Step 3: Export data from Shopify
To export data from your store, Shopify’s built-in export option is sufficient.
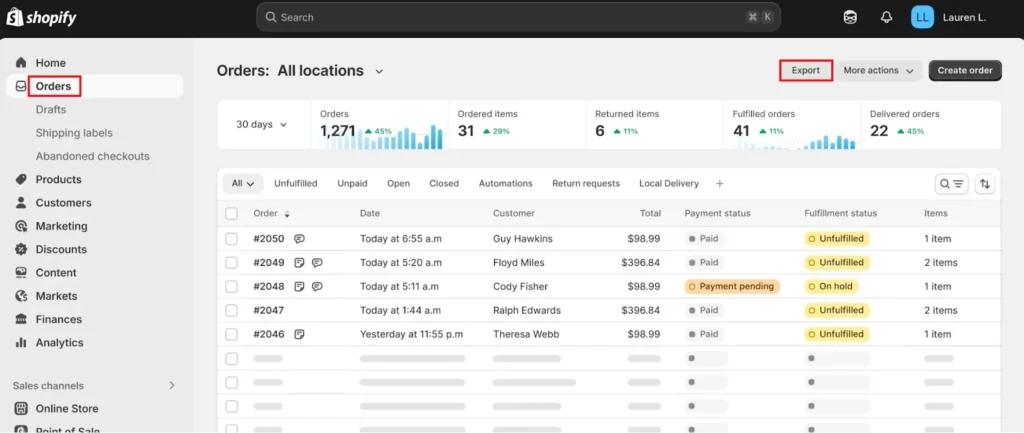
Exporting Products:
- Go to your Shopify admin dashboard, select Products and click on the Export button in the top-right corner.
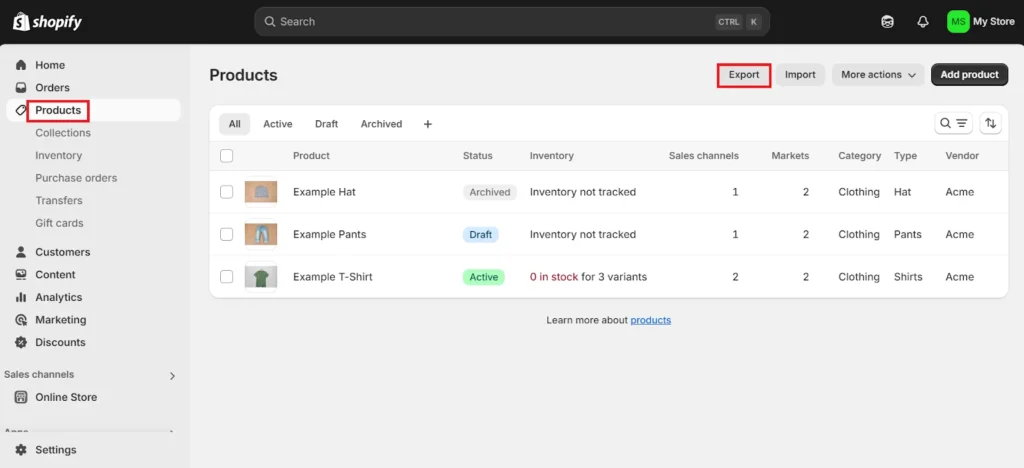
- Choose the export option as All products and select the export file format as CSV for Excel, Numbers, or other spreadsheet programs.
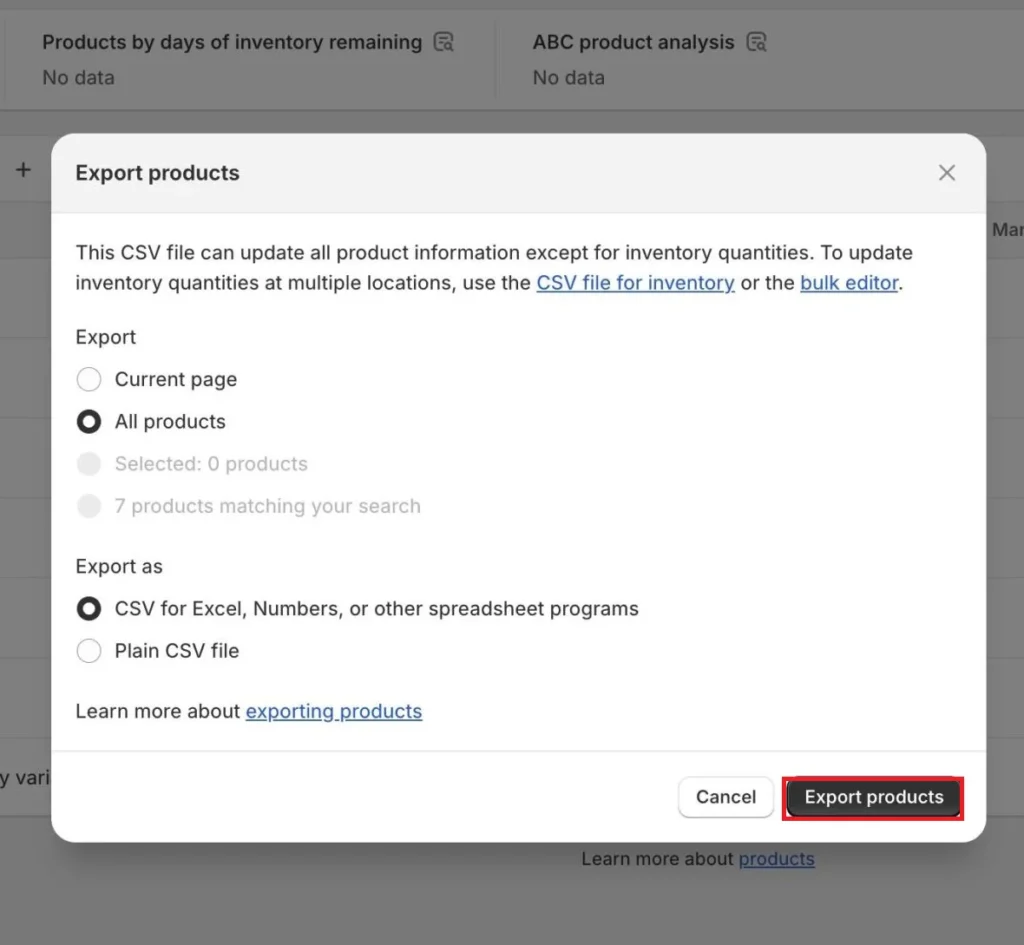
- After selecting the options, click on the Export Products button to export the CSV file.
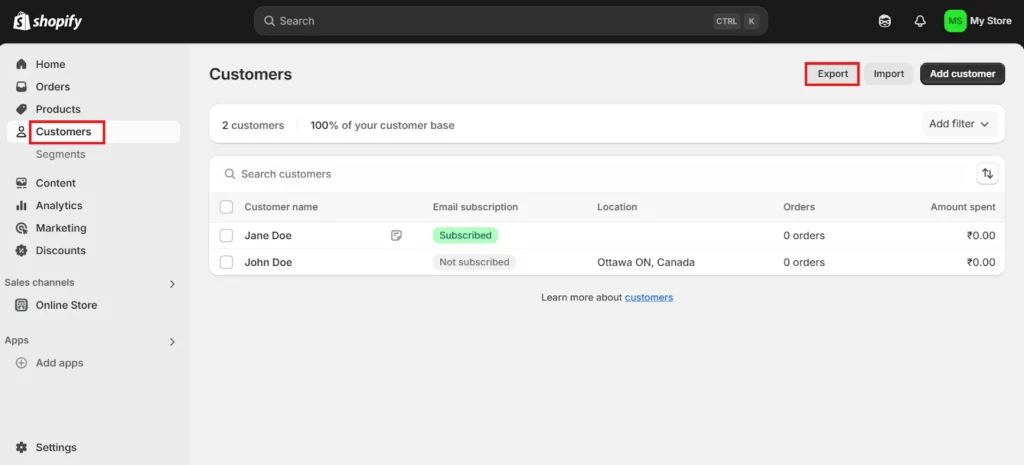
Exporting Customers:
- Similarly, to export Customers, go to the dashboard → click Customers → Export, and choose the export options as mentioned above.
Exporting Orders:
- Follow the same procedure for exporting orders too. Dashboard → Orders → Export and choose the export options.
Shopify will send all the exported data to the admin email. From the admin email, you can download the CSV files separately and save them on your device.
Now that we have all of our Shopify data exported, we can begin importing them into WooCommerce.

WP Ultimate CSV Importer Pro
Get Ultimate CSV/XML Importer to import data on WordPress faster, quicker and safer.
Step 4: Importing Data into WooCommerce
Note: Shopify and WooCommerce store data differently. For instance, certain fields used by Shopify can be named differently or need not even exist in WooCommerce. So, we recommend reviewing and adjusting your CSV files to match the WooCommerce field structure before importing. Take a look at our sample CSV files for further reference.
- WooCommerce products sample CSV
- WooCommerce customers sample CSV
- WooCommerce orders sample CSV
- WooCommerce reviews sample CSV
- WooCommerce coupons sample CSV
Importing products:
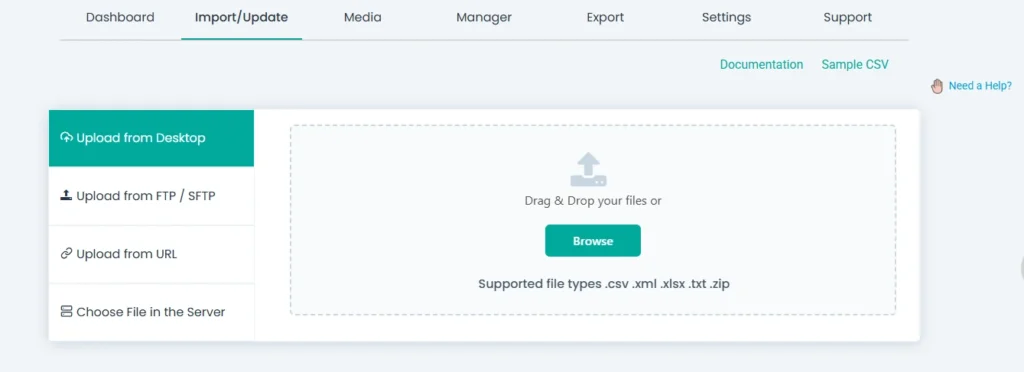
From your WordPress dashboard, open WP Ultimate CSV Importer.
- Upload the CSV file
The plugin offers multiple options for importing data. You can upload the exported product CSV file directly from your desktop.
After uploading your CSV file, you will see two options: Fresh Import and Update Content for importing data into your site.
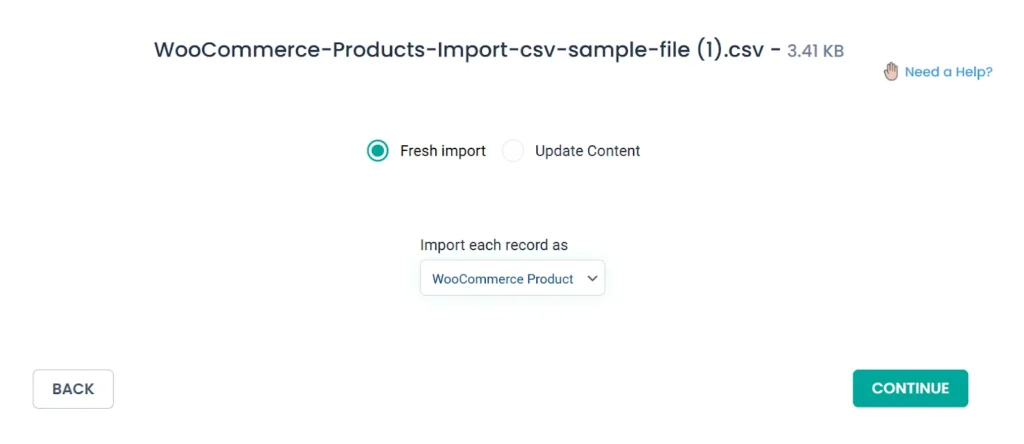
Since you are importing this data for the first time, choose Fresh Import and select WooCommerce products as the post type. Click Continue.
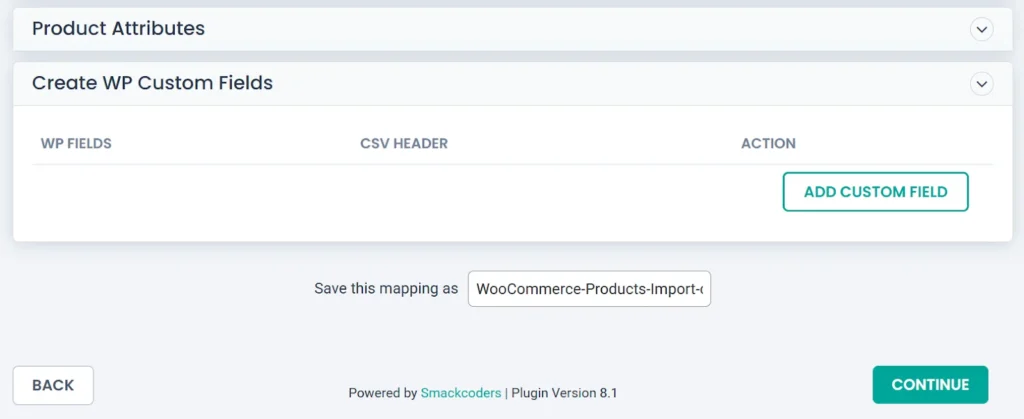
- Map the fields
Next comes the mapping section. Here, you will be prompted to map your CSV column names with the relevant WooCommerce fields.
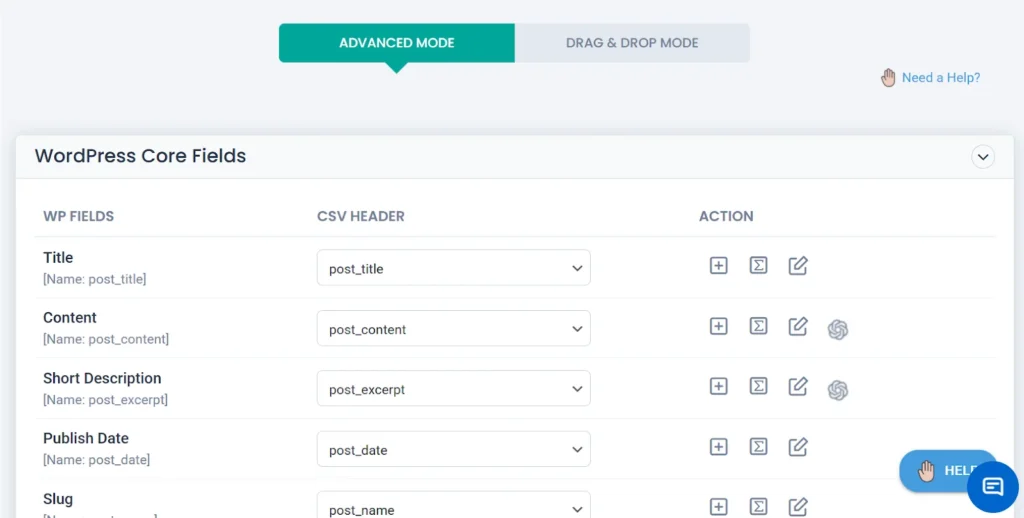
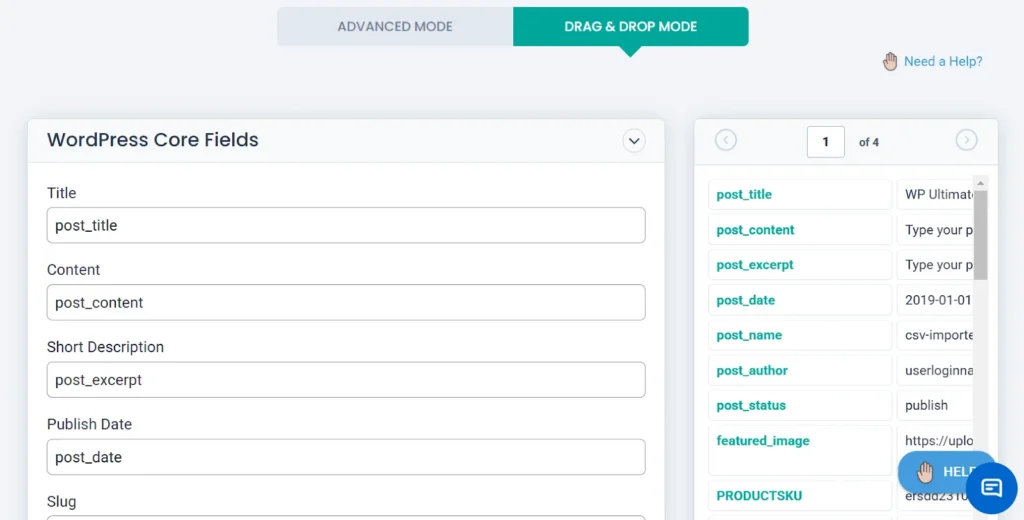
The advanced mode lets you map the fields using the drop-down method while the drag-and-drop mode allows you to map the columns by dropping them onto their appropriate fields. You can also see a convenient preview of your CSV columns on the right while using the drag-and-drop mode.
For example: you have to map the product name with the post title, the product price with the regular price, etc.
A key advantage of this plugin is its ability to automatically map your CSV file’s columns to the corresponding WooCommerce product fields if their names match. However, it is always better to double-check manually whether all of your fields are mapped correctly.
After mapping the fields, click Continue. You can also save the mapping template for future use.
- Configure Import settings
Next, the import configuration settings regarding rollback, maintenance mode, handling duplicates, and scheduling the import will be displayed. You can enable the settings you prefer or you can just continue with the options as it is.
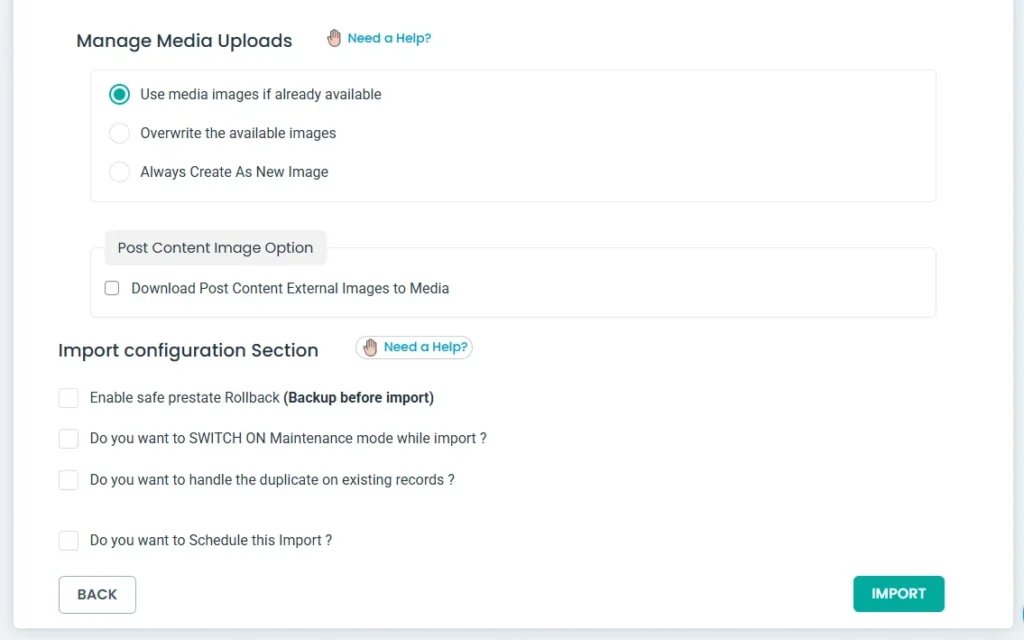
- Run the import
Click the Import button.
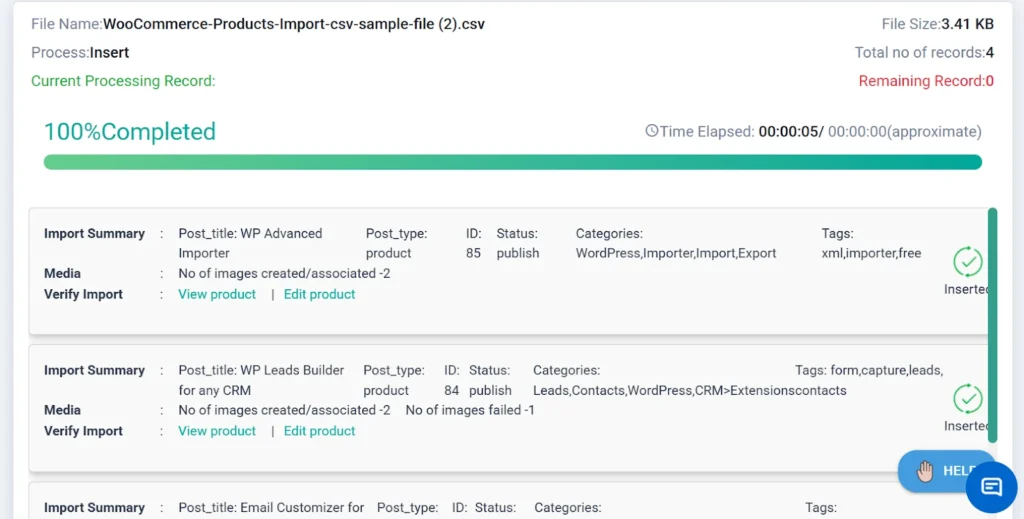
That’s it! Within a few seconds, you can easily import Shopify products to WooCommerce using WP Ultimate CSV Importer.
You can check your imported products by clicking Products → All products from the WP dashboard.
Note: In Shopify, the product images are stored in separate columns while in WooCommerce the product images must be stored in a single column, which can result in a few missing fields during the transfer. It is advised to adjust your CSV file accordingly to prevent any missing data.
Importing Customers:
Now let’s proceed to importing customers.
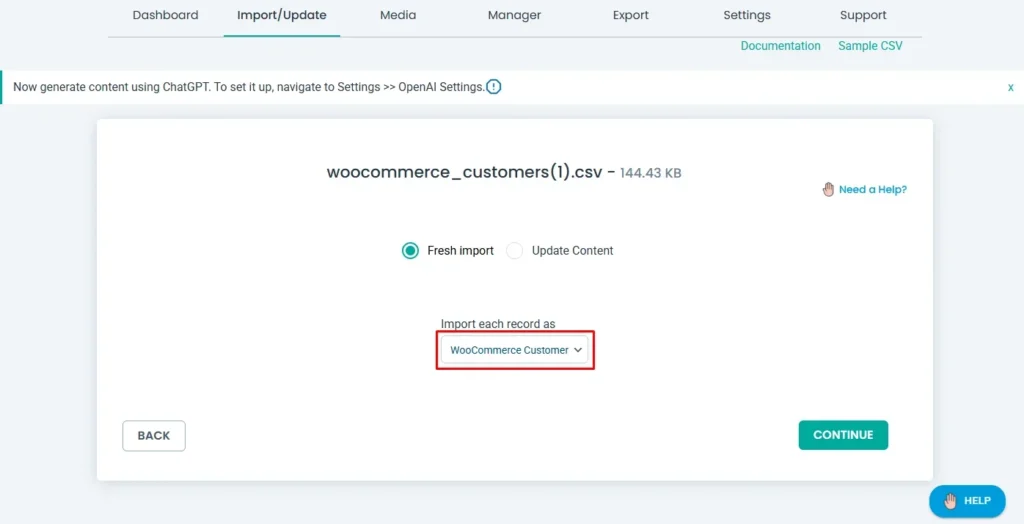
- Upload the CSV file
To import Shopify customers to WooCommerce, start by uploading your CSV file by clicking on the Browse button.
In the post type, select WooCommerce customers and click Continue.
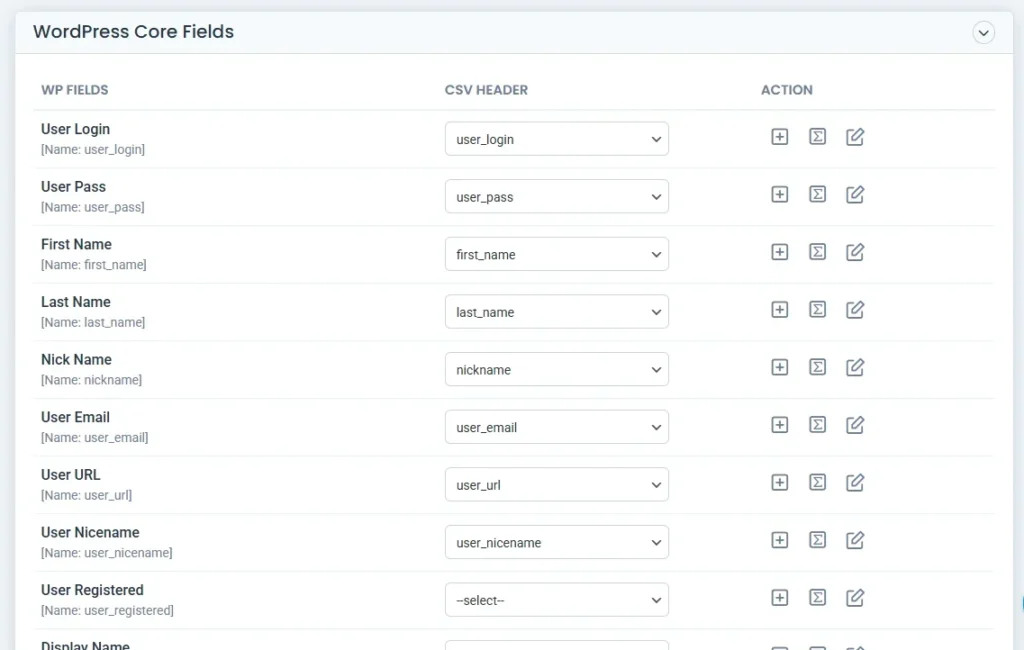
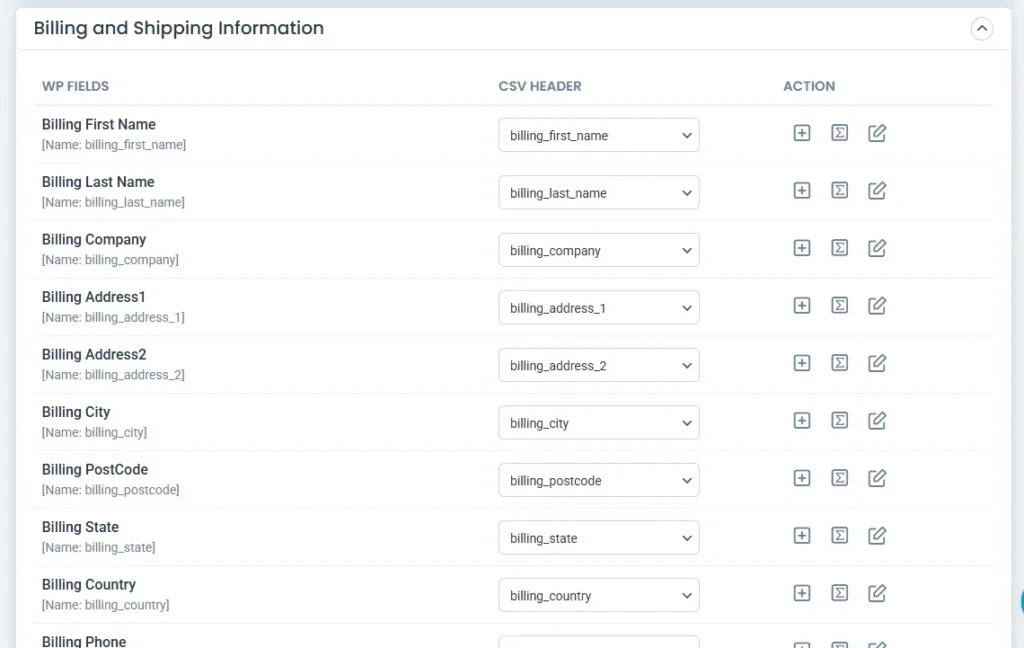
- Map the fields
Next, proceed with mapping your customer columns with the WordPress fields using the advanced mode or the drag-and-drop mode. Once done with mapping, manually check if they are matched appropriately and click continue.
- Configure import settings
You can keep the options as they are or if you would like to schedule this import, you can do so.
- Run the import
Click the import button to begin importing your customers. You can verify your customers from the WordPress dashboard → WooCommerce → Customers.
Note: Due to security concerns, Shopify does not allow the migration of customer passwords. So when you export customers from Shopify, you won’t be able to find the passwords column in your CSV. But when importing with WP Ultimate CSV importer, just add an extra column for password in CSV and you can leave that field values empty, the plugin will automatically generate a random password while importing them. You can notify the changes to your customers if you’ve enabled the option “Settings → Send password to user” before import.
Importing Orders:
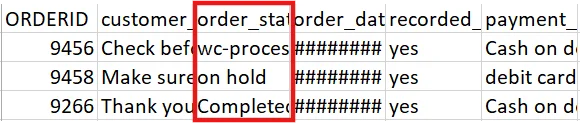
By now, you must have seen how easily this plugin works. Before importing orders from Shopify to WooCommerce, adjust your CSV file since Shopify and WooCommerce store order statuses differently.
Shopify stores the order status based on shipping, while the order status in WooCommerce is based on payments.
So you need to manually edit the data in your CSV file before uploading it for the import. For more details, you can check out the order status documents of Shopify and WooCommerce.
Here’s a quick reference for you:
Shopify Order Status → WooCommerce Equivalent
Fulfilled → Completed
Unfulfilled → Pending / Processing / On Hold
Partially Fulfilled → Processing / On Hold
Scheduled → Processing / Pending Payment
On Hold → On Hold
Now that you have adjusted your CSV files, let’s start with importing orders from Shopify to WooCommerce.
- Upload the CSV file
Open WP Ultimate CSV Importer and click browse to choose and upload your updated CSV file.
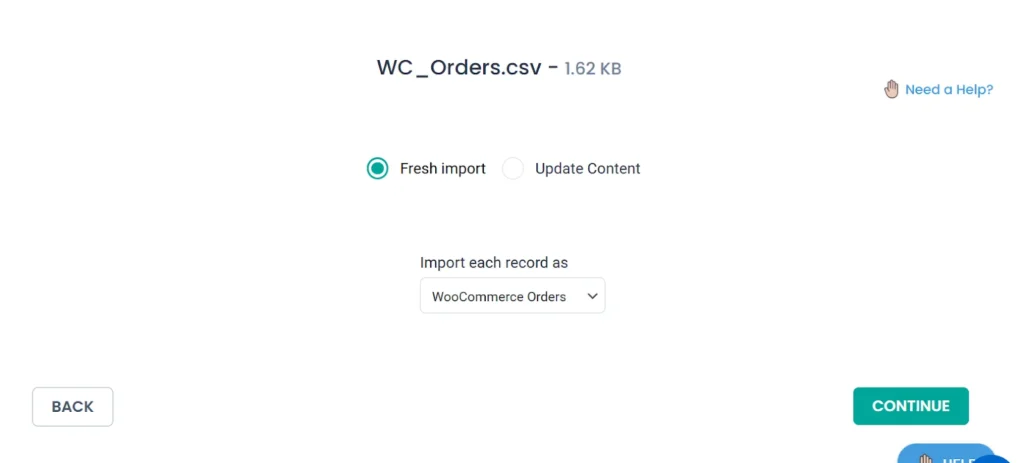
Select Fresh import and set the post type as WooCommerce Orders. Click Continue.
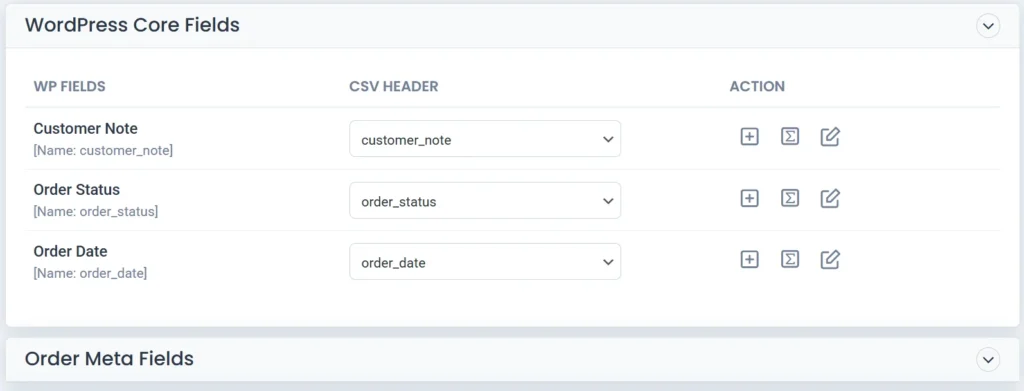
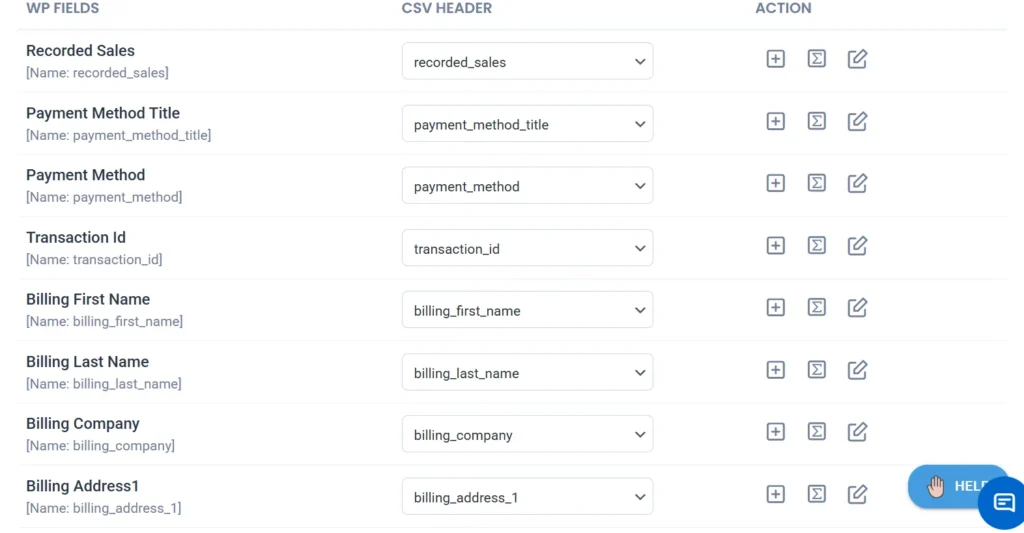
- Map the fields
Map your CSV column values with WordPress order fields and click Continue.
- Run the Import
You can skip the Import configuration settings and proceed with the import by clicking on the Import button.
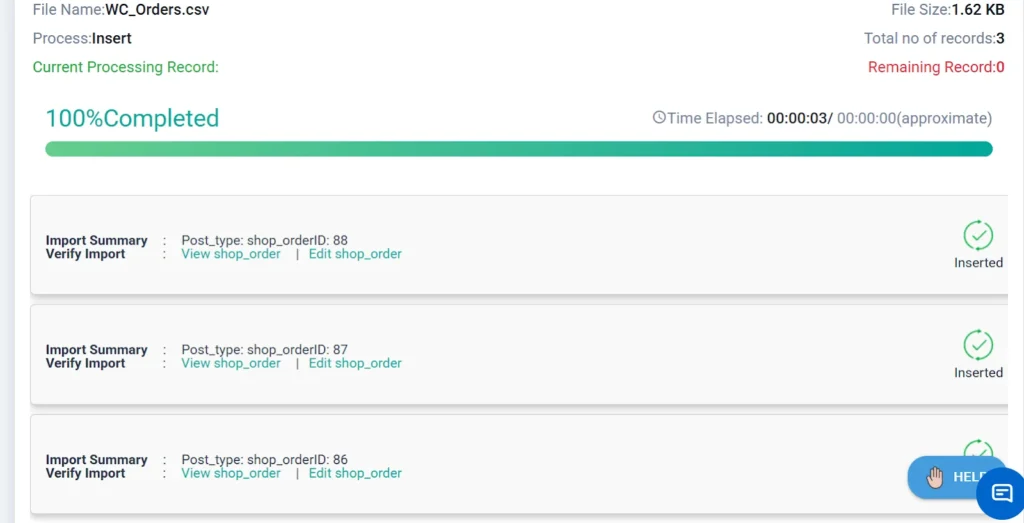
You can view your orders by going to the WordPress dashboard → WooCommerce → Orders.
Voilà! You have now successfully migrated your products, customers, and orders from your Shopify store to WooCommerce.
Final Touches for Migration
You can even take a step further and migrate product reviews and coupons from Shopify to WooCommerce using WP Ultimate CSV Importer. Here’s how to migrate product reviews and coupons in quick steps:
Migrating product reviews:
- Log in to your admin account in Shopify and go to Settings → Apps and sales channels → Product reviews.
- Click on Open App → Export. Your reviews will be exported in a CSV file.
- Now, go to WooCommerce → WP Ultimate CSV Importer and upload the CSV file.
- Select Fresh Import and set the post type as WooCommerce Reviews.
- Map the fields and finish by clicking on the Import button.
- You can view the product reviews from the WP dashboard → Products → Reviews
Migrating Coupons:
- From the Shopify admin dashboard, go to Discounts → Export.
- Select export options (selected/ all discounts) and choose the export file format as CSV for Excel, Numbers, and other spreadsheet programs.
- Click Export Discounts to download the CSV file.
- To import into WooCommerce, upload the CSV file in WP Ultimate CSV Importer.
- Choose Fresh Import and set the post type as WooCommerce Coupons.
- Then continue with mapping the fields. Once completed, proceed by clicking on the Import button.
- You can check the imported coupons from the WP dashboard → WooCommerce → Coupons.
Now what’s left is for you to finish setting up your WooCommerce site by customizing its looks.
There you go! You have your entire Shopify store migrated to WooCommerce in just a few steps. If you’d like to try our plugin, you can explore its features by using our free trial instance with sample CSV files.
WP Ultimate CSV Importer Pro
Get Ultimate CSV/XML Importer to import data on WordPress faster, quicker and safer.